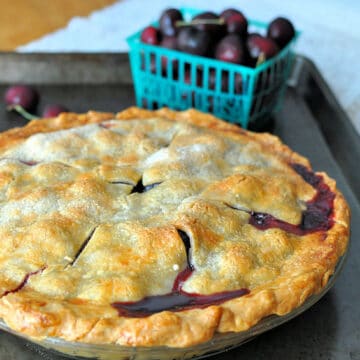
Cherry season is a big deal around our house. My favorite way to enjoy cherries it with a nice piece of Cherry Pie. And, evidently the same is true for my son.

I baked this delicious Cherry Pie, and we cut into way too soon and it didn't have a chance to completely set. But, all was still good. All of us enjoyed a slice, we took a piece to a friend, and my son came home and ate some more, and more, then he finished it for breakfast.

My husband starts talking about cherries a couple of months before our tree is ready to pick. As soon as cherry season is about to hit he starts checking out the local fruit stands and grocery stores. When he finally finds some, he will eat most of them on the way home.

Since the birds and squirrels think our cherry tree is there for them to snack on, I had to order some cherries from a local produce delivery service. I think I had about 12 - 14 pounds of cherries. Hubby started hitting them right away, and then I grabbed some to make this pie.
Here is my recipe.
Cherry Pie
6 cups Cherries
⅓ cup Cornstarch
⅔ cup Sugar, more if your cherries are tart
Save this recipe?
1 teaspoon Vanilla
½ teaspoon Cinnamon
Dash or two of Salt
1 Egg, beaten
Sugar
1 9" double crust Pie Shell
Clean cherries and remove pits. Cut in half if you like. Measure 6 cups of cherries and put in a strainer and allow to drain over a bowl if your cherries are extra ripe.
In a small bowl, mix together the cornstarch, sugar, salt and cinnamon.
In a large bowl, mix together cherries and vanilla. Stir in sugar mixture and blend well.
Put the cherries in a 9" pie crust and top with second pie crust. Crimp edges and brush top of pie with the beaten egg. Sprinkle with sugar. Put several slices in the top of the pie crust to let the pie vent as it cooks.
Bake the pie in a 400 degree oven for about 20 minutes, then reduce the heat to 350 and bake for an additional 40 minutes until the pie is a nice golden brown. Let the pie set for several hours to set. If you can't wait that long, it will still taste great, but will probably not hold its shape very well.
Enjoy!
Cherry Pie
Complete Recipe
Cherry Pie
Ingredients
- 6 cups Cherries
- ⅓ cup Cornstarch
- ⅔ cup Sugar more if your cherries are tart
- 1 teaspoon Vanilla
- ½ teaspoon Cinnamon
- ⅛ teaspoon Salt
- 1 Egg beaten
- Sugar
- 2 Pie Shell
Instructions
- Clean cherries and remove pits. Cut in half if you like. Measure 6 cups of cherries and put in a strainer and allow to drain over a bowl if your cherries are extra ripe.
- In a small bowl, mix together the cornstarch, sugar, salt and cinnamon.
- In a large bowl, mix together cherries and vanilla. Stir in sugar mixture and blend well.
- Put the cherries in a 9" pie crust and top with second pie crust. Crimp edges and brush top of pie with the beaten egg. Sprinkle with sugar. Put several slices in the top of the pie crust to let the pie vent as it cooks.
- Bake the pie in a 400 degree oven for about 20 minutes, then reduce the heat to 350 and bake for an additional 40 minutes until the pie is a nice golden brown. Let the pie set for several hours to set. If you can't wait that long, it will still taste great, but will probably not hold its shape very well.
- Enjoy!


Leave a Reply