Nutter Butter Halloween Cookies
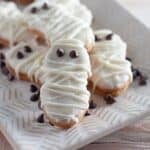
Spooky and delicious! Irresistible Nutter Butter Halloween Cookies, featuring adorable mummy cookies and ghost cookies that will delight kids and adults.
Servings: 32 Servings
Calories: 102kcal
Ingredients
- 16 ounces White Melting Chocolate or Vanilla Candy Coating
- 16 ounces Nutter Butter Cookies
- 2 tablespoons Mini Chocolate Chips
Instructions
- Melt the white candy coating according to the package directions.
- Scoop about ⅓ of the melted candy coating into a small plastic bag, or piping bag. You may want to keep the bag in a bowl of warm water until ready to use to keep it from setting up.
- Dip one side of each cookie into the melted candy coating to make the mummy cookies.
- Cover about ⅔ of each cookie to make the ghost cookies.
- Place dipped cookies on a wire rack to keep any drippings from pooling around the cookie.
- Use scissors to trim a very tiny bit from one corner of the plastic bag that contains the melted candy coating.
- Use piping bag to make the ghosts by piping a little bit more of the coating along the bottom edge of the dipped portion to make the ghosts appear to be floating. This works best if done before the melted candy coating on the cookie has set.
- Use mini chocolate chips to make the eyes for both the ghost cookies and mummy cookies. Use another chip to make the mouth on the ghost cookies.
- Once the candy coating on the cookies has fully set (meaning, it is firm to the touch and no longer melted), use the piping bag of melted candy coating to pipe lines across the mummy cookies in different directions to resemble mummy wrappings.
- Allow the candy coating to set at room temperature before serving.
Notes
Tips
- Make sure you use a white chocolate that melts easily and smoothly. White chocolate bars and chips are not really good choices.
- You will want to work in batches since the candy coating sets up quickly. You can probably coat about 6 cookies each time.
- Save the piping of the mummies for the final step. It is best to have the base coat set up before doing the piping of the mummy wrappings. Otherwise, the wrappings will just blend in with the rest of the white chocolate.
Nutrition
Calories: 102kcal | Carbohydrates: 14g | Protein: 1g | Fat: 4g | Saturated Fat: 2g | Polyunsaturated Fat: 1g | Monounsaturated Fat: 1g | Trans Fat: 0.002g | Cholesterol: 0.1mg | Sodium: 58mg | Fiber: 0.03g | Sugar: 8g | Vitamin A: 2IU | Vitamin C: 0.01mg | Calcium: 1mg | Iron: 0.01mg